
Guide to fitting a nitrous kit (pic heavy)
Page 1 of 2 • 1, 2 ![]()

Guide to fitting a nitrous kit (pic heavy)
![]() by martyboi Fri Apr 02, 2010 10:35 am
by martyboi Fri Apr 02, 2010 10:35 am
I made the guide a while back for another forum, so some of it might not make sense
 and i made a nitrous kit for it
**disclaimer** this is intended as a guide only, i will NOT be held responsible if you fit a kit and get it wrong!
Last edited by martyboi on Sun Apr 04, 2010 6:49 am; edited 4 times in total

martyboi- Admin

- Posts : 381
Points : 6315
Join date : 2010-03-27
Age : 40
Location : Norfolk -

Dummies Guide To Nitrous
![]() by martyboi Fri Apr 02, 2010 3:42 pm
by martyboi Fri Apr 02, 2010 3:42 pm
To make an engine produce more power, you need to make the combustion process more powerful. A nitrous oxide molecule is made up of 2 atoms of nitrogen and 1 atom of oxygen. By weight it is 36% oxygen and 64% nitrogen (air is only 23.6% oxygen).
So when nitrous is injected into the inlet manifold, as more oxygen is present, this allows more fuel to burn. also the nitrogen has the beneficial effect of reducing the temperature of the inlet charge, We all know cooler air is more dense which means more air in the same space therefore.... MORE power
All this increases the combustion process, and raises the force exerted on the pistons and this means more power. umm nice
There are a few different types of nitrous systems
1. dry (only injects nitrous)
2. wet (injects nitrous & additional fuel)
3. direct port (each port has a dedicated injection point, i.e a 4 cylinder engine would have 4, one on each port)
4.single point (as the name implies there is a single injection point before the inlet manifold branches off)


Basically you have a supply cylinder containing nitrous oxide (normally in the boot of the car) connected by a tube to a normally closed electric solenoid valve.
This solenoid valve is mounted in the engine bay in a cool area, and also as close to the point of injection as possible.
This is turned on by a micro switch at full throttle, The fuel solenoid valve receives fuel from tapping into the fuel supply line, this solenoid is also activated by the same micro switch.
The nitrous oxide and additional fuel (in the case of a wet system) is delivered to the inlet manifold through the injectors.
The amount of nitrous oxide and fuel is metered by the jets that are installed in the solenoid outlet fittings (unlike the systems made by nos, NX, etc etc. They put the jets at the injector..... the wrong place
 )
) Trevor langfield (wizards of nos) was the first to jet at the solenoids, and it results in a softer hitting system. unlike the hard hitting systems from nos, NX, etc.
A softer hit means less strain is put on the engine, and therefore more power can be added.
Mmmm thats what I'm talking about
OK so i know what your thinking..... nitrous oxide will blow my engine up

That film has so many problems, like the fact they made a big thing about activating the nitrous almost at the end of the race

whats the point in that? you activate it straight off the line, or when you have enough traction to put the extra power down.... don't believe everything you see in the movies
Its things like this that have given nitrous a bad name, but Its mainly from people who have used badly designed systems that have caused engine failure, used far more nitrous than an engine can handle, or just simply the fact that their engine was in bad shape in the first place and would have blown up anyway..... without the nitrous.
Last edited by martyboi on Sun Apr 04, 2010 4:08 am; edited 3 times in total
martyboi- Admin
- Posts : 381
Points : 6315
Join date : 2010-03-27
Age : 40
Location : Norfolk -
Things to do before fitting nitrous
![]() by martyboi Fri Apr 02, 2010 3:43 pm
by martyboi Fri Apr 02, 2010 3:43 pm
The first thing you want to do, is find out if the engine is in good working order.
The best way of finding this out is by having a "leak down test" done, this will show up any problem's like worn rings, valves, head gasket etc.
when carried out, there should be no more than 10% leakage from any cylinder.
A compression test can be done, but this will not be as useful as a leak down test, as the compression test will show a problem... but will not be as good at finding the cause.
with a compression test, cylinders must not vary any more than 10psi, and must be within manufacturers specs.
if there is a problem, it must be fixed before fitting nitrous.
Its wise to give the engine a good service too: oil, filters, etc.
Ignition system
As nitrous will put a higher demand on the ignition system, it will have to be up to the job.
you can test the ignition with a tester like This if its in good condition you should be OK
If the leads have seen better days get them changed for some decent quality leads.
Its also wise to fit a new set of plugs, and if your going for more than a 25bhp shot, its wise to change the plugs for a grade cooler than standard, this will help to prevent detonation.
Fuel system
the fuel system will have to be up to the job of providing the additional fuel, on relatively small shots the standard fuel system should cope.
but when you start adding large amounts, then the pump will need to be upgraded to a higher flowing pump, or another separate pump and regulator will be required, just for the nitrous system.
ill show how to test the fuel system later on
Its also a good idea to change the fuel filter.
Last edited by martyboi on Sun Apr 04, 2010 4:15 am; edited 2 times in total
martyboi- Admin
- Posts : 381
Points : 6315
Join date : 2010-03-27
Age : 40
Location : Norfolk -
Bottle mounting
![]() by martyboi Fri Apr 02, 2010 3:46 pm
by martyboi Fri Apr 02, 2010 3:46 pm
Many of the U.S kits do not have the pi mark on there bottles, this pi mark is required in the UK if you want to have your bottle refilled legaly.... fine, if you refill your bottle at home from a rented cylinder, or you know someone who will do it who turns a blind eye.
And if you try to get refills by courier, they will send it back to you.... but it will be empty I'm afraid
One place nitrous company's like to save money, is actually on the valve in the bottle.
i have seen many that are just a cheap standard Co2/mixed gas valves, just like the one i used on the bottle for my Clio, but they have chromed it to look a bit nicer.
this is OK, but they will not flow as much.
I used one because it was cheap, and i was on a tight budget.... did i mention it was cheap
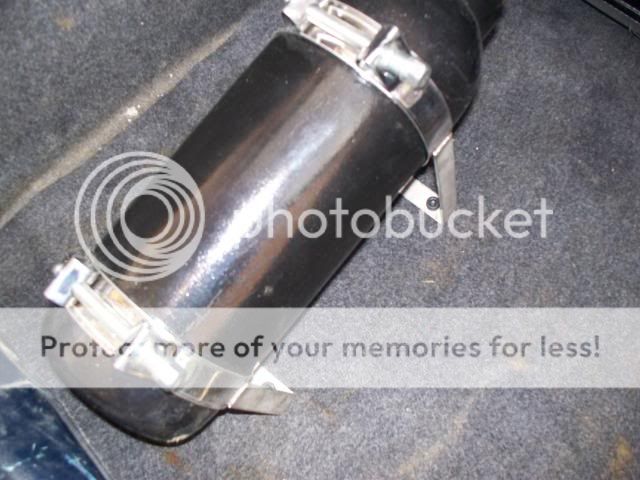
Anyway heres the bottle i used in the Clio, it was previously a CO2 bottle that was used in a pub

Another thing they like to use is a rupture disk.....
lets say its a really hot day, and the bottle is exposed to direct sunlight, and the nitrous pressure builds up in the bottle to dangerously high levels.
or even worse, it has a bottle warmer wrapped round it which fails to switch off after it has reached optimum temperature

well... instead of the bottle blowing up, the rupture disk blows out venting 'ALL' your expensive gas to atmosphere
Here is a maxiflow valve from wizards of nos
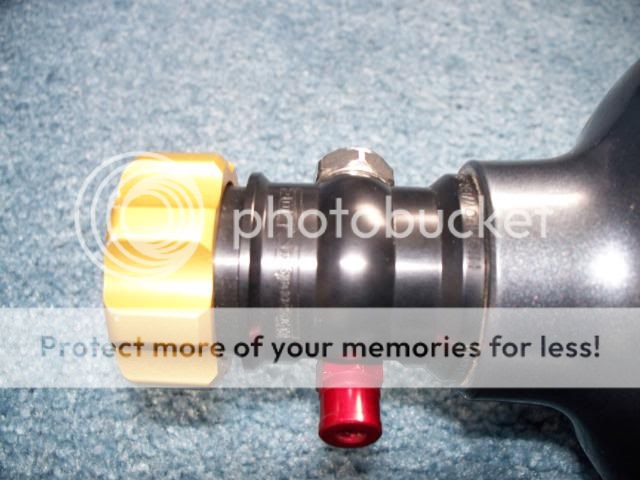
High flow low friction seat
Minimal expansion chamber
Low friction coated internals to minimize wear and consequential system contaminationoverlapped hand wheel and body
The little anodized red valve on the side is a S.P.R.V (safety pressure release valve)
This replaces the conventional rupture disk.
Using the same scenario above with the bottle over heating, instead of blowing out like a rupture disk, it just safely releases a little nitrous at a time, Just enough to bring the bottle pressure back down to safe levels.
no more loosing all your gas in one go, and no replacing disks either
Heres a couple of vids
original source:www.noswizard.com
sprv vs standard rupture disk
Valve drop test
Hmmmmm.... i know which one i would rather have
The best place for the bottle to be mounted is close to the solenoids, to keep pipe runs short.
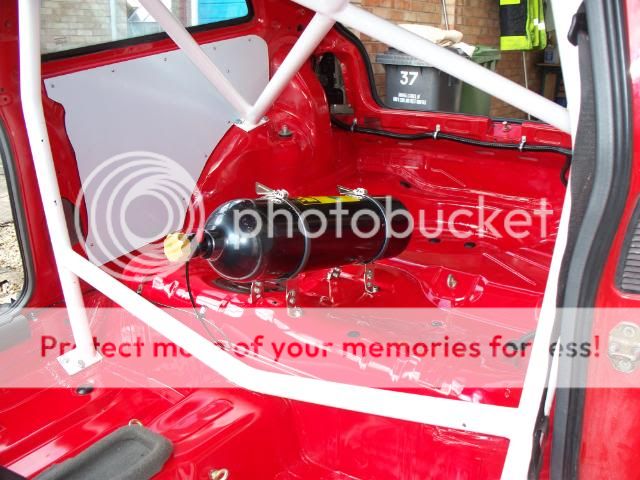
In most cases this is not possible, so tho boot will have to do.
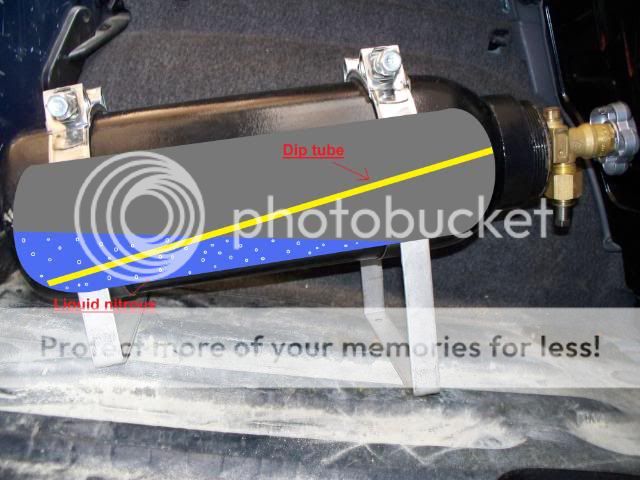
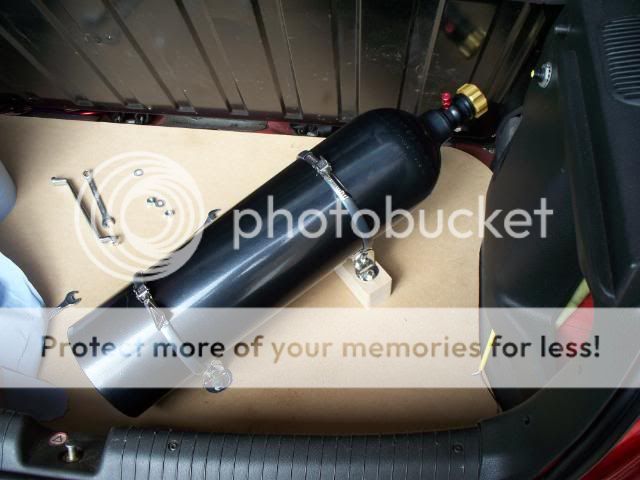
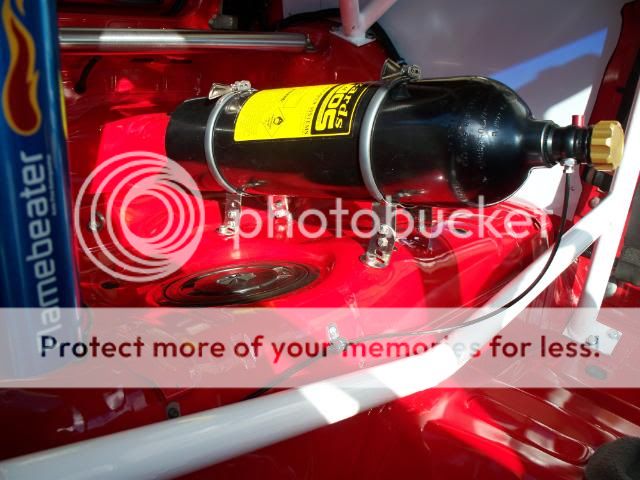
The bottle needs to be mounted at an angle (about 15 degrees is best) with the outlet facing down, as shown in the pic.
This is because the dip tube inside has to be able to pick up liquid nitrous, this is very important!
The bottle obviously needs to be fixed down securely with bolts and washers, its also good practice to use a thread-locking compound too.

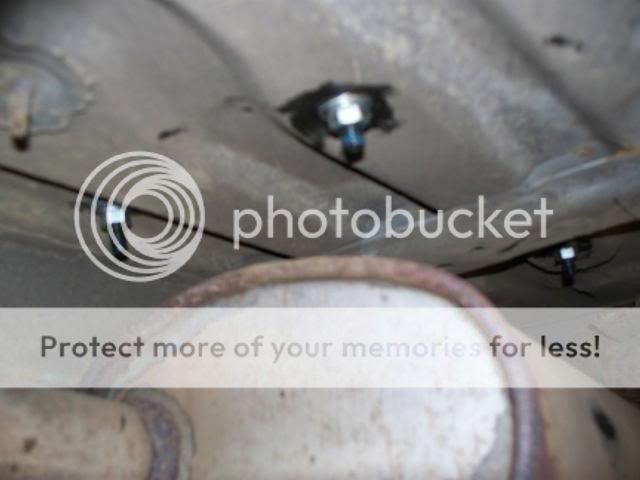
After deciding where the bottle will go (i chose the passenger side on the Clio, as the solenoids would be on the same side up front) first thing to do is check there is nothing in the way underneath that the drill could pass through and damage, like pipes, wires, etc.

Naa.. just a rusty pea shooter under here
Next, mark out the holes where you want to drill.
When the holes are drilled, paint over the bare metal to prevent rust, and also use a little silicone sealant to prevent any water getting in, the sealant also holds the washers in place till the nuts are fitted, which is a bonus.
To make the holes in the carpet i found it best to use a wood drill bit, with the drill in reverse and a block of wood underneath.
When i tried to fit the bottle in the corsa, i had to make a false floor, as there was a wheel well which prevented me from bolting the bottle down to the boot floor.
So i just used the boot carpet as a template, and made the false floor out of some MDF.
I made sure it was a tight fit, so it wouldn't move about.

I just used some T-nuts underneath for the bolts fix in.

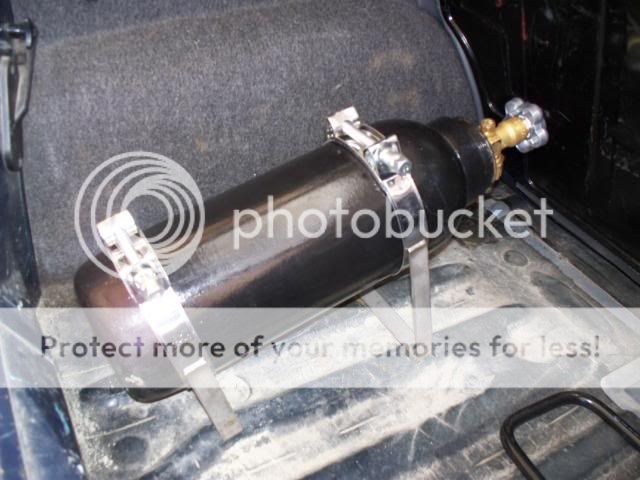
The only way the bottle would fit in the boot was diagonally, this is not perfect, but the only way i could get it to fit in there.
i also had to use a block to raise the front up higher, just so it would fit.

The main thing to remember when mounting the bottle, is that the dip tube will be able to pick up liquid nitrous under hard acceleration, and that it is mounted securely.
Last edited by martyboi on Sun Apr 04, 2010 4:35 am; edited 6 times in total
martyboi- Admin
- Posts : 381
Points : 6315
Join date : 2010-03-27
Age : 40
Location : Norfolk -
Bottle mounting (updated)
![]() by martyboi Fri Apr 02, 2010 5:07 pm
by martyboi Fri Apr 02, 2010 5:07 pm
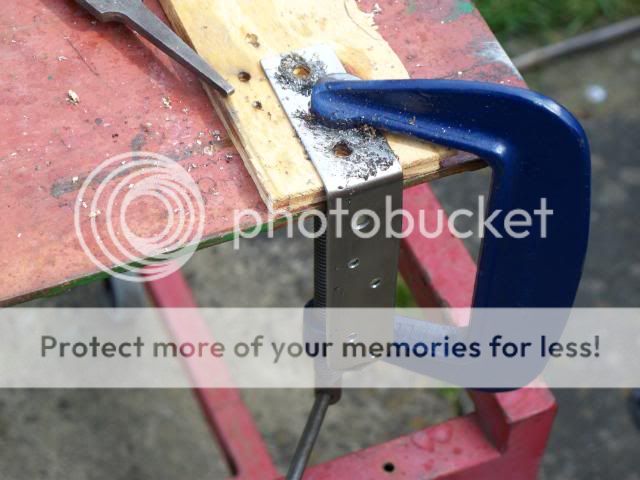
I bought a riv-nut gun so i could fit the bottle, well worth buying one
Riv-nuts are very similar to a pop-rivet, but the difference is they have a thread inside that you can screw a bolt in, this is handy on a car as you don't need access to the other side of the panel.
Just in case you haven't seen one before these are the riv-nuts (Used one on left, new one on right)

Drill a hole in the panel (make sure theres nothing the other side the drill will damage!)

Add the riv-nut

Then use the gun to squeeze the riv-nut, and hold it in place
Wella! One captive nut that will accept a bolt

Repeat

Then just bolt the bottle down.
And I used some rubber lined p-clips to hold the line in place
Now i have better access to the bottle

Last edited by martyboi on Sun Apr 04, 2010 5:08 am; edited 1 time in total
martyboi- Admin
- Posts : 381
Points : 6315
Join date : 2010-03-27
Age : 40
Location : Norfolk -
Solenoid/Pulsoid instillation
![]() by martyboi Fri Apr 02, 2010 5:17 pm
by martyboi Fri Apr 02, 2010 5:17 pm
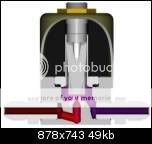
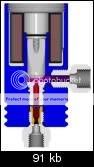
are basically a "normally closed valve"
when they are energized, the electro magnet inside moves the plunger off its seat, by doing this.. the nitrous or fuel (depending on the solenoid) is allowed to flow through.
When they are not energized, the plunger is held on the seat by a small spring and the pressure of the nitrous/fuel.
If there is too much pressure, they actually wont be able to open at all.
These are typical generic solenoids, as used by many nitrous company's.
Normally, the only difference between brands, is a different sticker.
The only reason i used these on my Clio was because they were cheap.... and i wasn't bothered if they failed and blew my engine up

The main problem with this kind of solenoid is the seat material, dynotune actually recommends the seals are inspected and replaced regularly.... why make a decent seal that doesn't fail, when you can earn more money selling replacement seals $$$
Another problem is the treacherous route the nitrous/fuel has to travel to get through these solenoids, its not exactly a smooth ride.
You shouldn't energize this type of solenoid for too long, because it will burn the coil out, and as for trying to pulse them with a progressive controller..... don't expect them to last long
Generic solenoid
WON Pulsoid
These are the pulsoids from wizards of nos, as the name suggests... they are designed to be pulsed.

For a start, they are designed to never wear out... won say that the seals actually look better after they have been used
The flow path inside is allot smother than the generic solenoids, which means greater flow and more performance
You don't have to worry how long they are energized for either, you can keep them going till you've run out of gas.... Thats if you can find a long enough road
You only have to look at them to see they are made to a higher standard than anything else out there...
Mounting
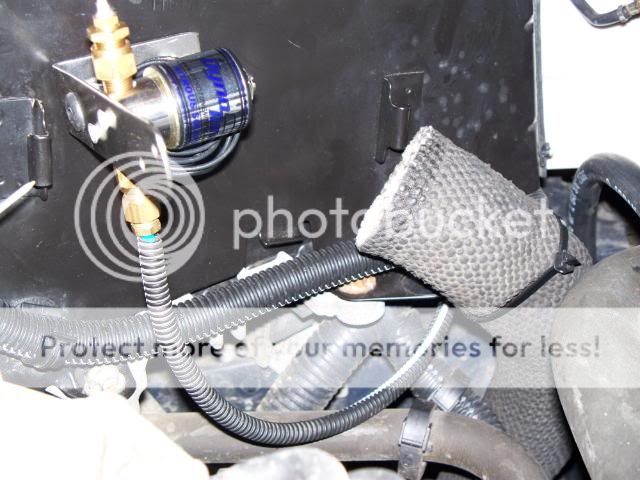
The solenoids need to be mounted in a cool area in the engine bay, also the pipe length to the injector must be kept as short as possible, no more than 12" for best performance.
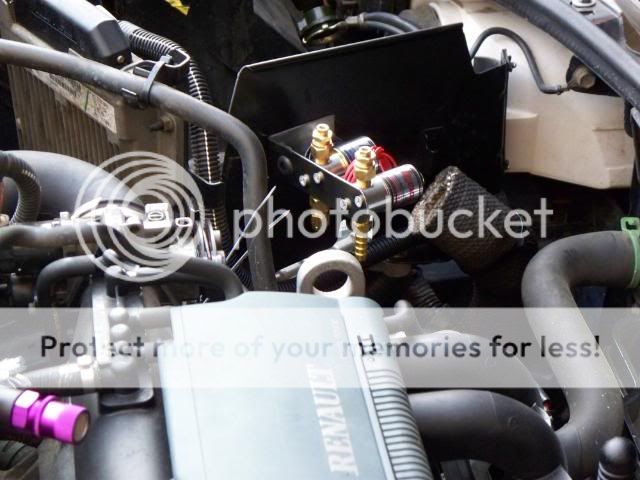
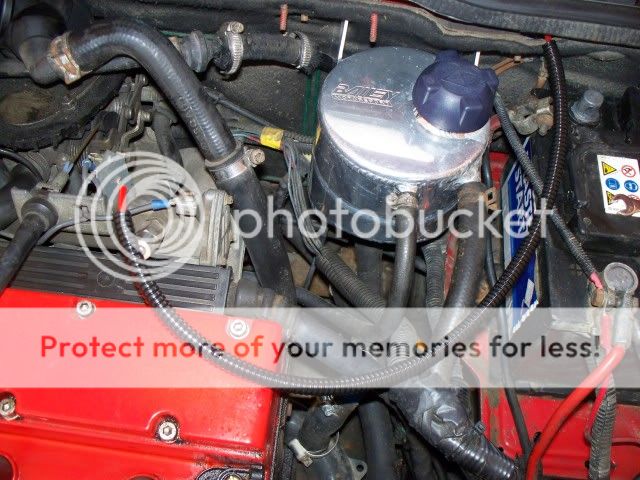
On the corsa i was able to mount them under the scuttle panel, this is one of the best places, as it is shielded from the heat of the engine.
If the solenoids are mounted in a hot area, the liquid nitrous will turn gaseous, you want the nitrous to stay in liquid form as long as possible to get the most out of it.

I was lucky as there was already bracket there holding a fuse box in place, which only had one fuse in the whole box.
So i just removed the box, flipped the bracket round and mounted the pulsoids to it.
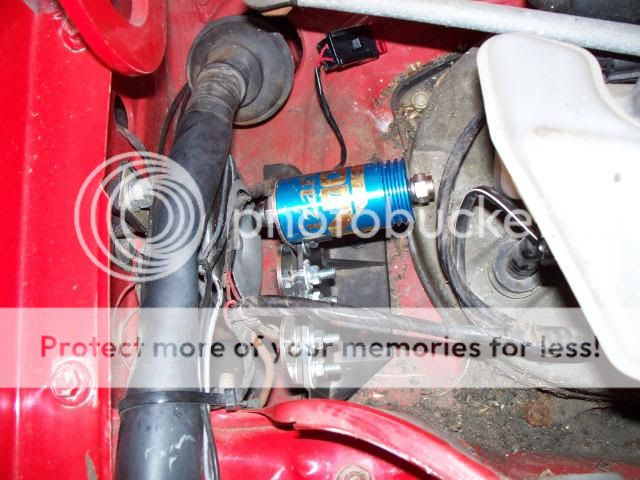
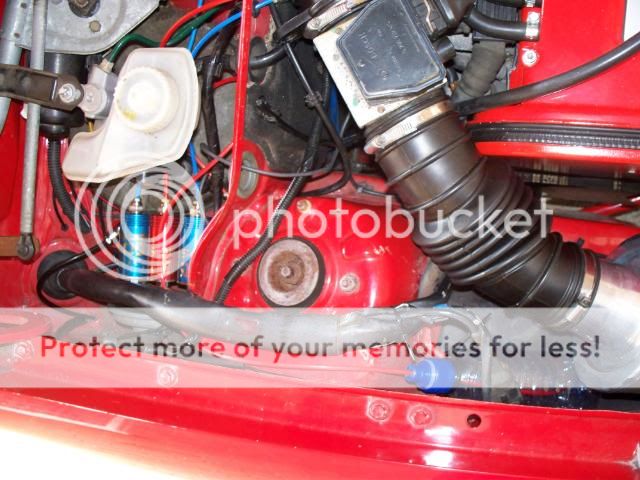
On the Clio i had to mount them in the engine bay, next to the injectors. I also rigged up a cold air feed (the pipe to the right of the solenoids) to help keep them cool.
I wasn't as lucky with this one tho, i had to make a bracket up for them to fix too.
The worst place to mount solenoids is behind the engine, as this is an area where heat will build up, and get very hot!
If you have no option but to mount them in a hot area, try to shield them from the heat.
Last edited by martyboi on Sun Apr 04, 2010 5:15 am; edited 1 time in total
martyboi- Admin
- Posts : 381
Points : 6315
Join date : 2010-03-27
Age : 40
Location : Norfolk -
Single point injector mounting
![]() by martyboi Sat Apr 03, 2010 2:48 pm
by martyboi Sat Apr 03, 2010 2:48 pm
A good setup should have the nitrous 'atomize' the fuel into a fine mist.
There are two different types of injectors out there, one of them has a separate injector for the nitrous, this is situated behind another injector for the fuel, like this...
I actual made these myself out of some pneumatic fittings, and a little piece of copper tube that i soldered in the fitting, and drilled a hole in the side
The one at the back is for the nitrous, and the one at the front is for the fuel, so as the nitrous is sprayed out, the fuel is collected by the nitrous and atomized.

Here's a little vid, if you look closely you can see the fuel entering the nitrous plume
This is the combined crossfire injector on the corsa
The reason the fuel comes out first is because I'm running a progressive controller, i had it set up so theres a slight delay for the nitrous. you can also see that is is being pulsed too.
Many other nitrous company's use combined injectors (fogger nozzles) too, but many of them have a large expansion chamber inside... This is not great for best flow and performance
and this is also the place where they fit the jets..... not good.mounting
As i mentioned before, some manifolds will not do well with a single injector setup, if the mixture cannot distribute evenly between cylinders, you will get big problems.
As the mixture will not be equal for each cylinder, some will be getting more fuel, where others are running lean
So if the manifold travels up wards, some fuel may not reach the engine, it can possibly puddle in the manifold, this can lead to intake backfires, in this case its best to go direct port.
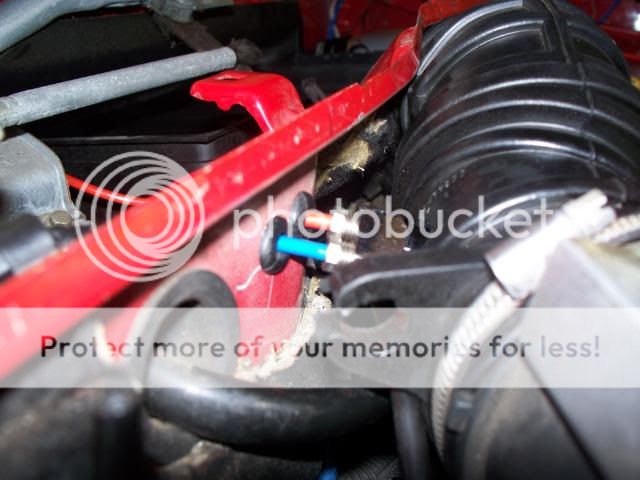
The injector must be mounted as close to the throttle body as possible, its usually possible to mount it in the rubber intake tube, i usually use a wood drill bit for this.


Mount the injector at about a 15 degree angle to the pipe, this will help the mixture swirl and distribute more easily.
Last edited by martyboi on Sun Apr 04, 2010 5:28 am; edited 4 times in total
martyboi- Admin
- Posts : 381
Points : 6315
Join date : 2010-03-27
Age : 40
Location : Norfolk -
Basic direct port instillation
![]() by martyboi Sat Apr 03, 2010 2:53 pm
by martyboi Sat Apr 03, 2010 2:53 pm
And if you are running throttle bodies.... you cant get away from it.
Its basically the same as a single point setup apart from each cylinder has its own injector, so a 4 cylinder engine would have 4 injectors, and a 6 cylinder engine would have 6, and so on.
On a basic 4 cylinder setup, a distribution block is used to distribute the nitrous and fuel to the 4 injectors.
With many American kits, they use badly designed distribution blocks that do not distribute the nitrous/fuel evenly.
You can see in this video (about halfway through) how the majority of the nitrous goes to the top two outlets of the block.
Original source: www.noswizard.com
Generic direct port kit (purged)
Direct port instillation
If installing a distribution block from won, it is best to have it mounted upright, so the inlets are vertical.
This will ensure even distribution to all injectors.
Installing the injector is a little more tricky, because you will need to drill and tap a thread into the inlet manifold.
It is best to do this with the manifold taken of the car, just in case any swarf from drilling enters the engine.
The location of the injectors in the inlet runners needs a bit more thought too, this is mainly due to reversion.
What is reversion?
As the inlet valves remain closed for the majority of the otto cycle, this will mean that nitrous will be spraying down the inlet runner at a closed valve for most of the time, if the injector is mounted too close, the nitrous can bounce off the valve.... this is reversion.
This is not such a problem when using a single point system, or a small shot on a DP system.
But when a large shot is used it can become a problem.
So its best to mount the injector as far away from the valve as possible to prevent reversion.
Here is a setup on an MR2 using venom injectors, as you can see the distribution block is mounted upright, and the nitrous injector is mounted as far back as possible.
Original source: http://forum.nitrous-advice.org/viewtopic.php?f=28&t=4124[img]

Here's a Peugeot 205 running Yamaha R1 bike carbs, this is using the crossfire injectors.
As the carbs do not allow the injector to be mounted too far away from the valve, this is the only option.
Original source:http://forum.nitrous-advice.org/viewtopic.php?f=6&t=3990

Also when plumbing the injectors, keep the pipe lengths equal to ensure correct distribution.
Last edited by martyboi on Sun Apr 04, 2010 5:37 am; edited 4 times in total
martyboi- Admin
- Posts : 381
Points : 6315
Join date : 2010-03-27
Age : 40
Location : Norfolk -
Switches & Wiring
![]() by martyboi Sat Apr 03, 2010 3:01 pm
by martyboi Sat Apr 03, 2010 3:01 pm
find a suitable place to mount the arming switch, somewhere in easy reach is a good idea.
before you go drilling holes, obviously make sure there is nothing behind that will be damaged by the drill.


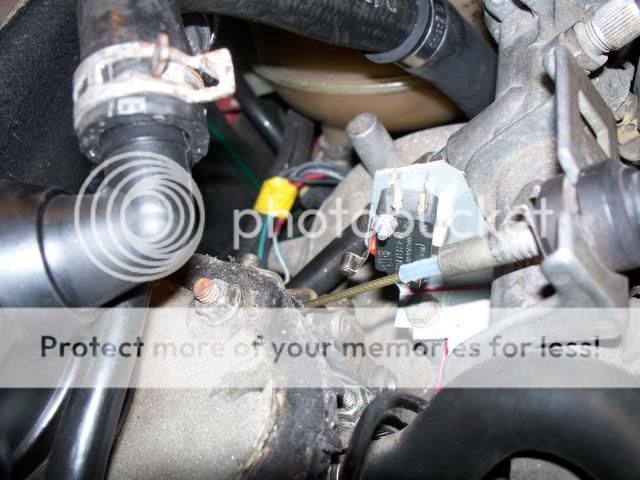
Heres the switches i used on the corsa, the one on the left is for a purge kit.

Throttle switch
As you only want to activate the nitrous at full throttle, you will need a switch that will be activated, only when the throttle is fully open.
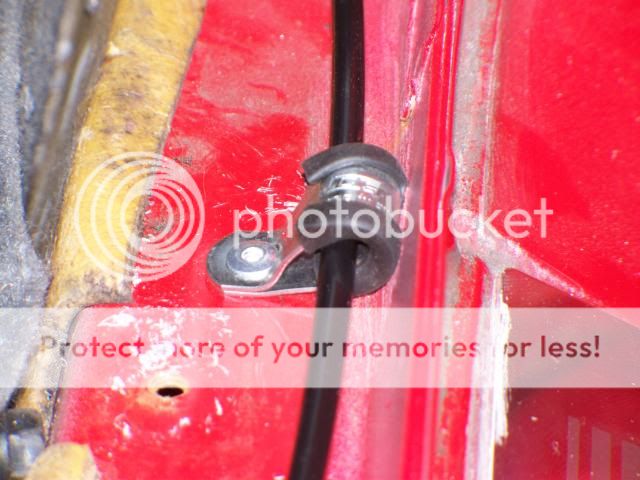
theres a couple of ways to go about this, the cheapest way is to fit a micro switch on either the throttle body linkage, or on somewhere on the foot pedal linkage.
alternatively WON sell a TPS activation switch that is allot easier to install than the micro switch, this can be found HERE
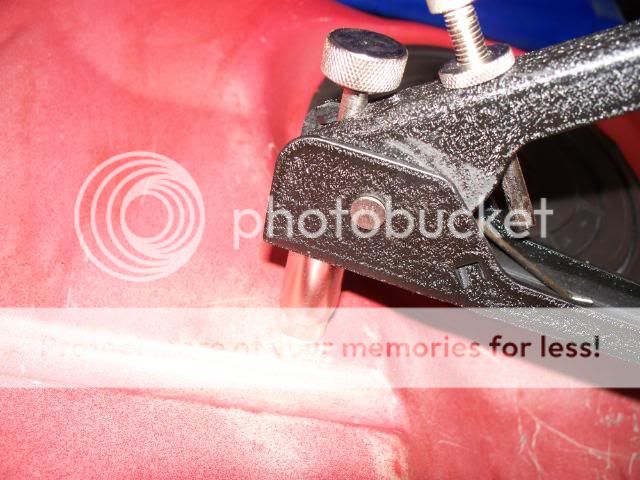
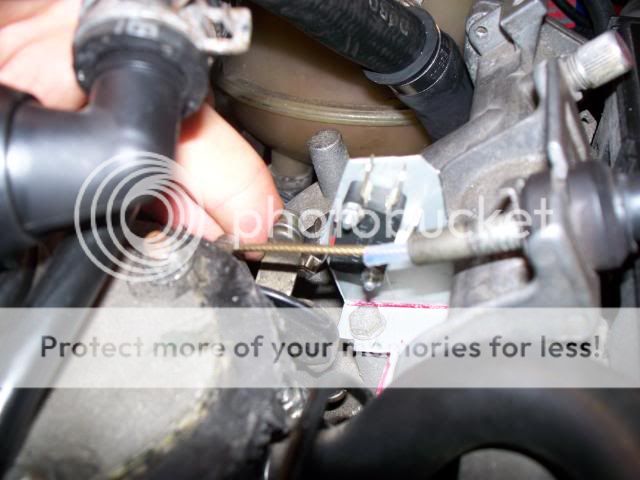
On both the Clio and the corsa, i used a micro switch mounted on the throttle body.
Throttle closed
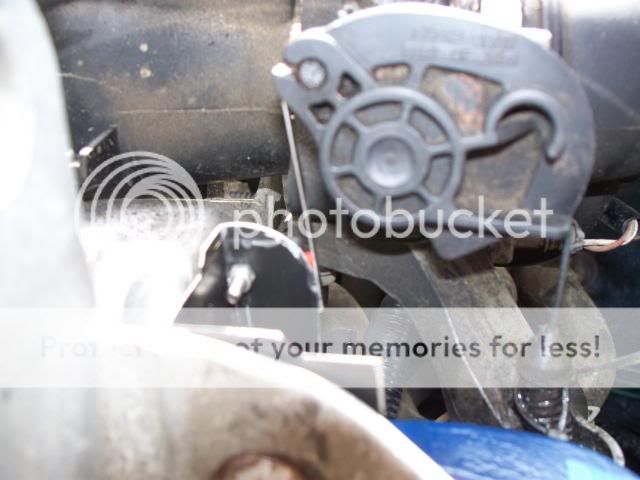
Throttle open
just make sure that the switch is only activated, when your foot is fully on the accelerator pedal, and it doesn't get jammed or stuck, this is very important!!
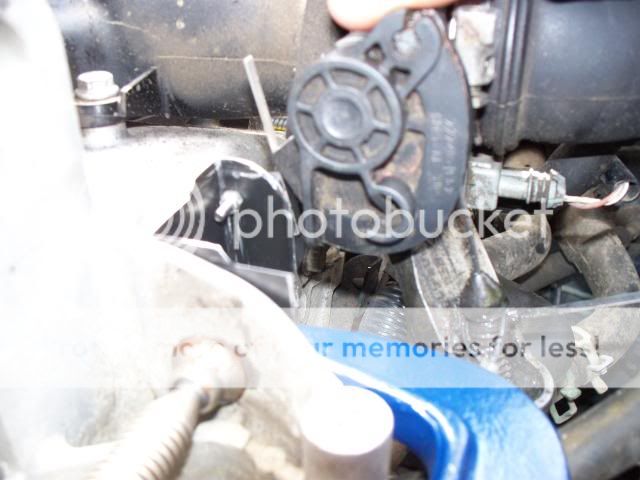
Heres the one on the corsa
Throttle closed
Throttle open
Simple stuff realy
Wiring

Wiring is fairly straight forward TBH when using wiring and switches from WON.
If you can find a suitable switched live (only live with ignition in position II) that will not be used when the nitrous system is activated, and is capable of supplying the solenoids, then you can wire up like in the following diagram.
if using different switches, they must be rated for at least 12 amps, otherwise a relay must be used.

I prefer to run a live from the battery and use a relay as shown in the following diagram, this is the safest way TBH.
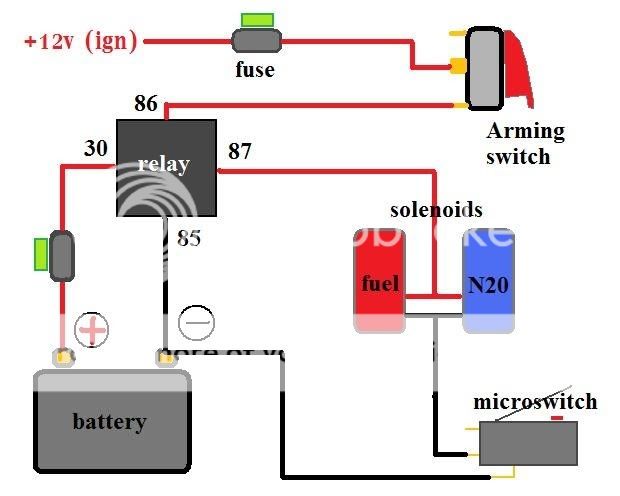
use a test meter to find the switched live, it is important that this wire is only live when the ignition is in position II.
try to find the biggest wire you can, then solder a spur wire on and insulate the join, this will be the +12v (ign)

When finding places to mount the relay, have a look in the fuse box as there might be a spare place that isn't being used


just remember when running any wires, make sure all connections are insulated and secure, and the wire will not chafe on bare metal etc.
use cable ties to tidy things up, and if you drill a hole for the wire to pass through, use a grommet.
Last edited by martyboi on Sun Apr 04, 2010 5:39 am; edited 1 time in total
martyboi- Admin
- Posts : 381
Points : 6315
Join date : 2010-03-27
Age : 40
Location : Norfolk -
N20 Supply Plumbing
![]() by martyboi Sat Apr 03, 2010 3:20 pm
by martyboi Sat Apr 03, 2010 3:20 pm
nylon line supplied by won is much better if running up to 125-150bhp and doesn't need to be purged.
Theres allot of argument's about which best to use, heres a link that might help you decide for yourself.
http://forum.nitrous-advice.org/viewtopic.php?f=4&t=151
N2O plumbing
When routing the supply pipe, try to take the shortest route possible, also make sure the line doesn't get close to any sources of heat, as this will cause the liquid nitrous to turn gaseous which will cause loss in performance.
Try not to kink the pipe, as this can weaken it, and its also a good idea to leave a little extra pipe the bottle end, then you will be able to cut the pipe down a little bit if you ever need to change the nut and olive for a new one.
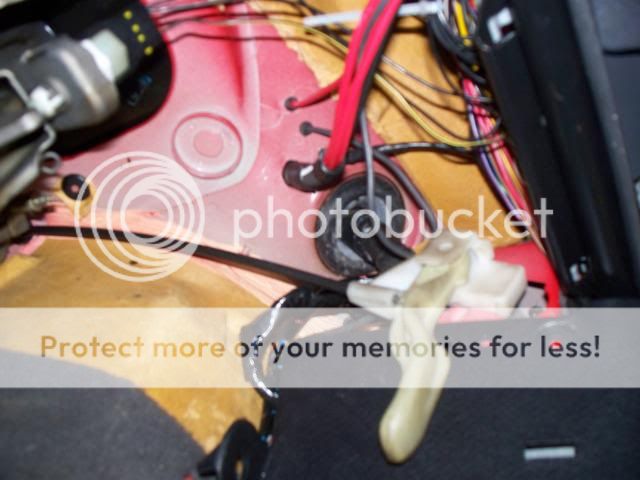
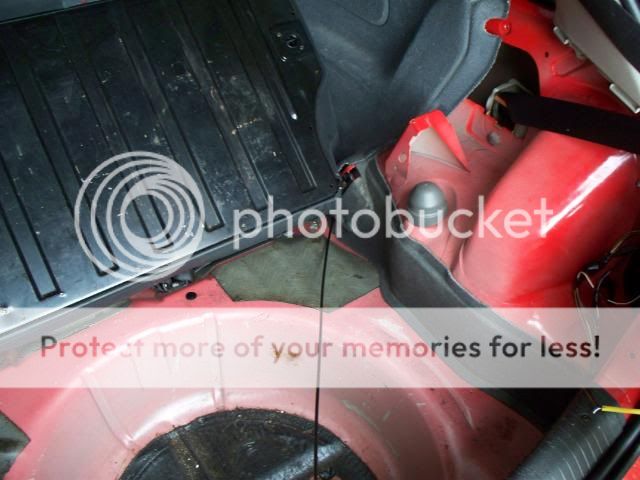
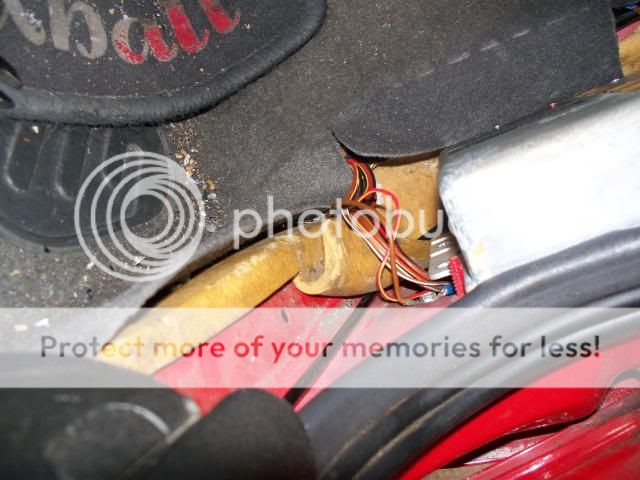
The best place to run the pipe is underneath the plastic trim inside the car.

On the corsa, I used p clips to hold the pipe in place under the trim.
On the Clio there were clips already under the trim, so i just used them.

Just make sure when the trim is replaced it doesn't crush the pipe!
The pipe can now be run under the dash to the engine bay.
You will probably need to drill a hole through the bulkhead to get the pipe through, if you do... don't forget to use a grommet to stop the pipe getting damaged.
If the solenoids are mounted in the front of the engine bay, its better if the pipe is run behind the wing as this will be cooler.
this is what i did on the Clio, i covered the pipe with convoluted tube to help protect it.

The nylon pipe is connected to the bottle and solenoid using a nut and olive fitting, use Stanley knife with a new blade to make a clean cut, then slide the nut onto the pipe and then the olive.
Do not over tighten the nut, as this will crush the pipe and reduce flow, you should tighten the pipe enough so it will not come out when pulled on hard.
Connect the pipe to the bottle first, and secure the other end of the pipe so it wont move about, then just open the valve for a second to clear the pipe through before it is connected to the solenoid, this will blow any crud out of the pipe.

Then the pipe can be connected to the solenoid using a nut and olive.
Don't forget the pipe has to go into the inlet of the solenoid... not the outlet!

when you have connected the pipe up, open the bottle valve and check for leaks, use some washing up liquid diluted in water, and just put a little around all connections. If there are any leaks you will be able to see bubbles, if they are leaking tighten the connection up a little and check again.
If you look closely you can see a bubble, this connection is leaking.

Last edited by martyboi on Sun Apr 04, 2010 5:42 am; edited 1 time in total
martyboi- Admin
- Posts : 381
Points : 6315
Join date : 2010-03-27
Age : 40
Location : Norfolk -
Fuel Take-off & Plumbing
![]() by martyboi Sat Apr 03, 2010 3:28 pm
by martyboi Sat Apr 03, 2010 3:28 pm
it is very important that you locate the correct pipe!
A good way of checking, will be to find the fuel line that runs from the fuel filter to the fuel rail.
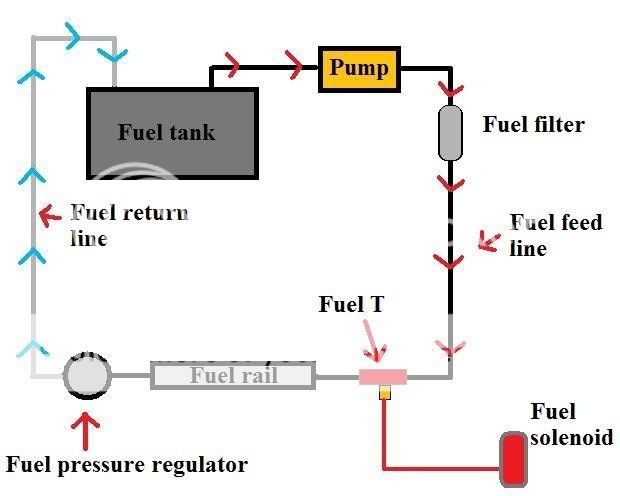
Theres a couple of ways to do this, you can either tap into the feed pipe with a t-piece as in the diagram above.
Alternatively.... if your fuel system has a fuel pressure test port, Won sell adapters that will convert it to accept a nylon line
WARNING
Fuel is highly flammable, make sure the fuel system has been depressurized before you start any work on the fuel system.
you can do this by removing the fuse for the fuel pump, and then trying to start the car.
There will still be some fuel in the pipe's, so just be carefull!
Fitting a T-piece
when you have found the correct line to use, find a suitable place to cut the pipe, preferably as close as possible to the fuel solenoid.

make sure you use proper fuel hose clamps, do not use the typical worm drive hose clamps, as these can leak!
Then connect the hose that will run to the solenoid.
This is the typical T-piece that you will get with an American kit.


The T-piece from won will allow you to connect a 4mm nylon line into it, opposed to using a bulky rubber hose as above.

Original photo from NITROUS OXIDE ( nos / n2o ) advice forum
Shrader valve adapter
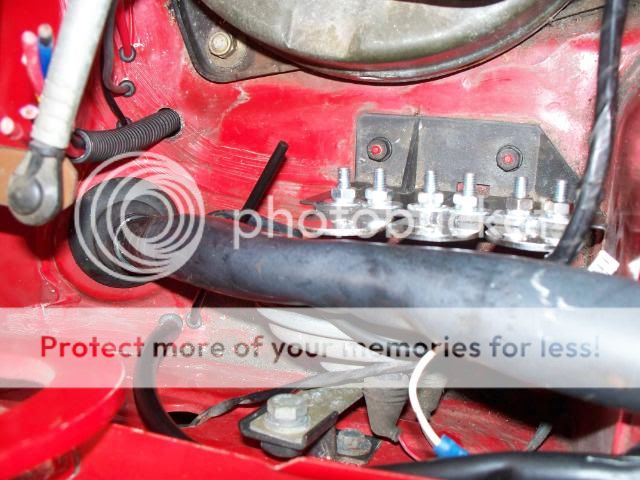
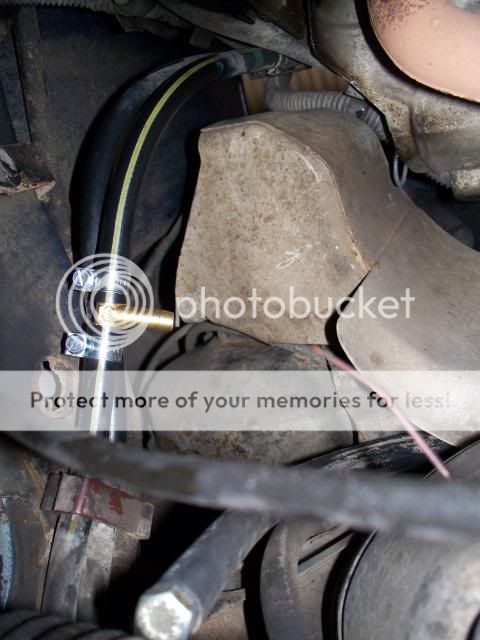
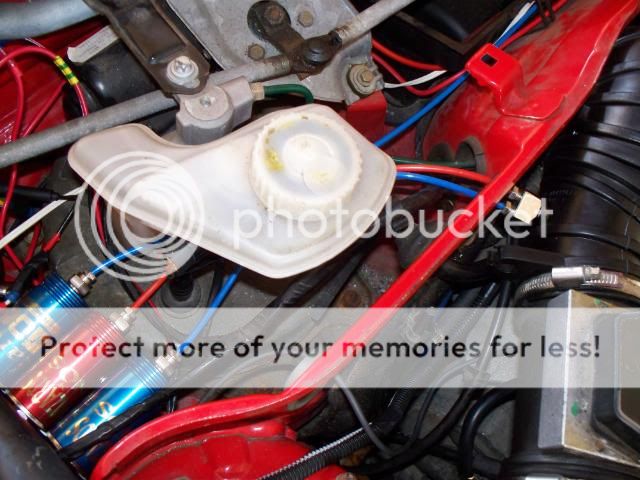
If your car has a fuel pressure test port on the fuel rail, you can get an adapter from WON
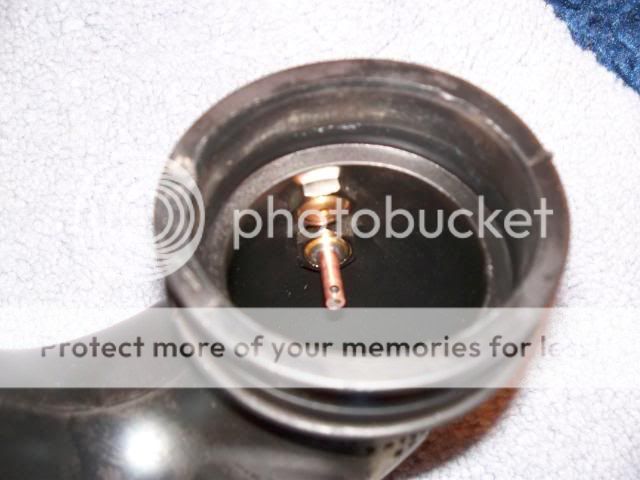
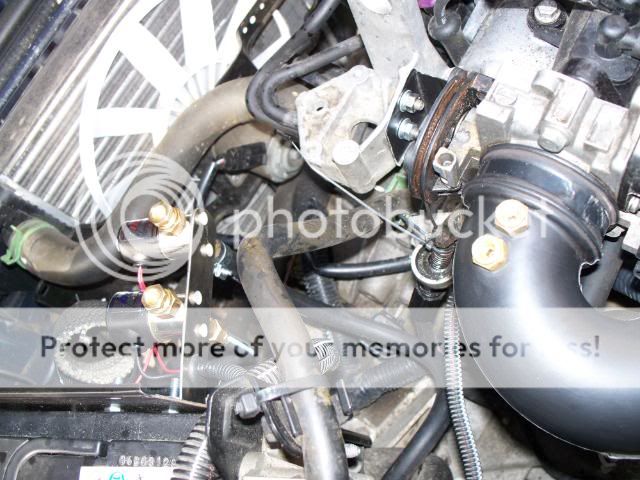
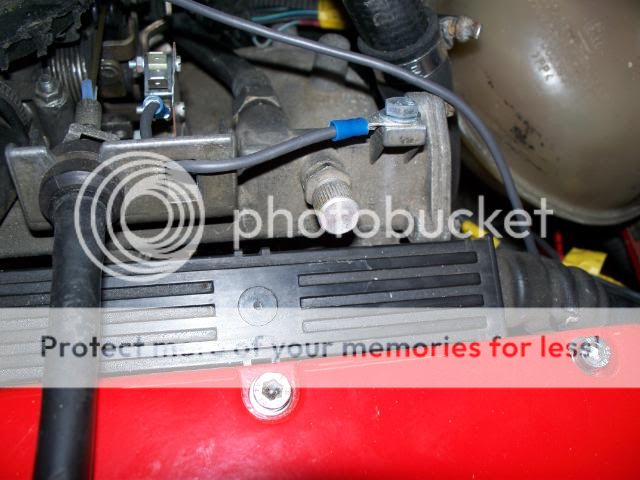
Here is the test port on the engine in my corsa.
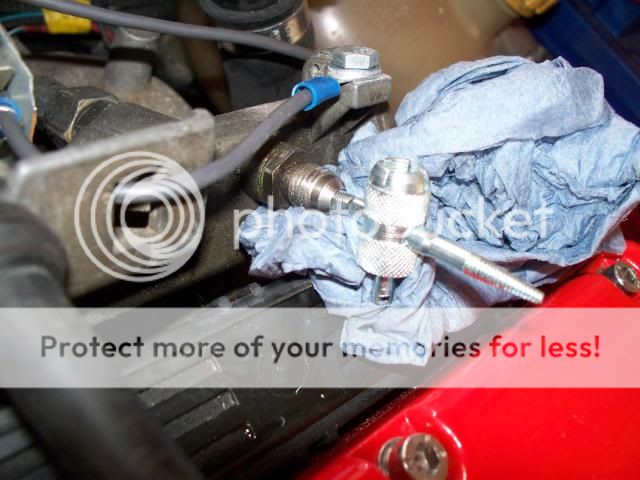
Won supply a tool that will enable you to remove the valve core... THIS IS VERY IMPORTANT!!

Very carefully depressurize the fuel system, start to screw the tool into the valve with the tissue wrapped round to stop any fuel spraying anywhere.
The fuel will be under very high pressure, so be carefully!!!!!
With the fuel system depressurized, you can use the tool to remove the valve core.
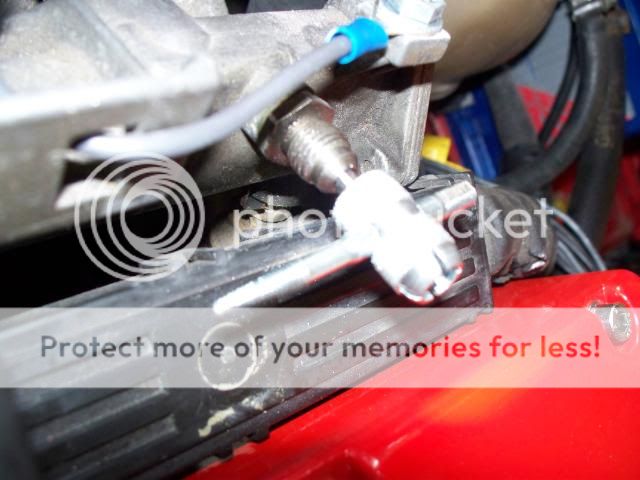
Valve core removed.
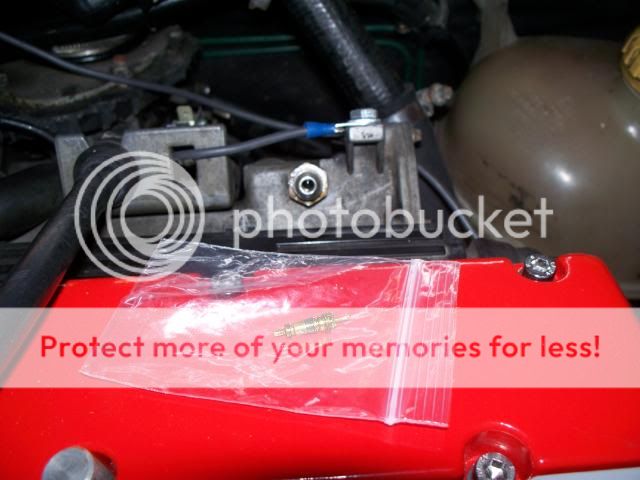
Them the adapter can be screwed onto the valve, remember to use the sealing washer supplied. (very important!)
Now you have a fuel takeoff... simple stuff eh
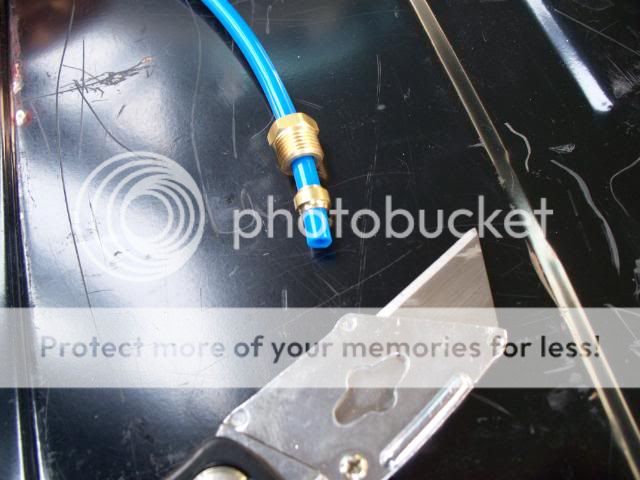
The nylon line can now be connected using a nut & olive, run the line to the fuel solenoid, making sure to keep away from sources of heat.


When all connected up, don't forget to check for leaks!!!!
Last edited by martyboi on Sun Apr 04, 2010 5:49 am; edited 2 times in total
martyboi- Admin
- Posts : 381
Points : 6315
Join date : 2010-03-27
Age : 40
Location : Norfolk -
(Updated) Heat shielding
![]() by martyboi Sat Apr 03, 2010 3:29 pm
by martyboi Sat Apr 03, 2010 3:29 pm
I put some convoluted tube over the pipe first.
Then the heat proof sleeve.

I also used a cable tie, and some aluminum tape to hold the ends in place.
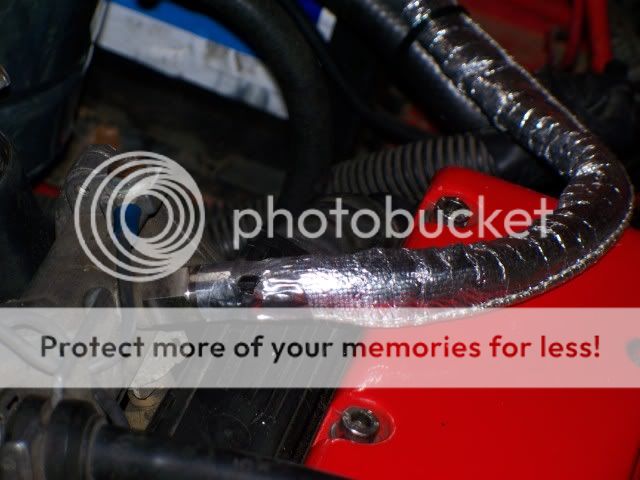

you can also use this method on the nitrous line if it is run in a area where it will get hot
Last edited by martyboi on Fri Apr 16, 2010 4:07 pm; edited 2 times in total
martyboi- Admin
- Posts : 381
Points : 6315
Join date : 2010-03-27
Age : 40
Location : Norfolk -
Jets
![]() by martyboi Sat Apr 03, 2010 3:52 pm
by martyboi Sat Apr 03, 2010 3:52 pm
Most American kits have the jets fitted at the injector, but WON fit the jets at the solenoid.
There are many reasons the jets are located at the solenoid with WON systems, there is a good explanation HERE
Here are the jets from won, they are just screwed into the outlet fitting of the solenoid/pulsoid.

The jet is basically a screw, with a hole drilled through it, and the size of the hole determines how much fuel/nitrous is able to flow through.... simple eh
Without jets
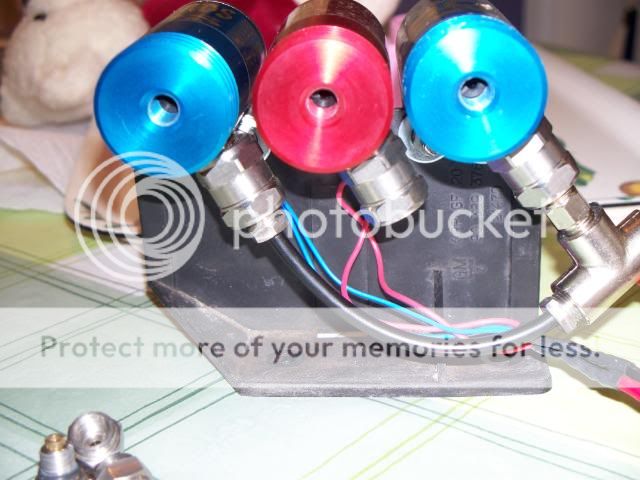
With jets

The jets from won have a number stamped on the side so you don't get them mixed up.

Typically on a fuel injected car the fuel jet is half the size of the nitrous jet.
E.G. for a 25bhp shot the fuel jet would be 25 and the nitrous would be 50, i say 'typically' because there are a few things to take into consideration like fuel pressure, distribution, and the pressure of the nitrous (due to the fact, nitrous pressure is directly related to temperature)
So in my case with the corsa, i have 100 size jet for the nitrous, and a 40 size jet for the fuel to get a 50bhp shot.
It is best to speak to won when ordering jets!
when i did the Clio, i actually made, and drilled the jets myself
i wouldn't advise doing this with the jets from WON tho!


Last edited by martyboi on Sun Apr 04, 2010 6:24 am; edited 1 time in total
martyboi- Admin
- Posts : 381
Points : 6315
Join date : 2010-03-27
Age : 40
Location : Norfolk -
Injector Plumbing
![]() by martyboi Sat Apr 03, 2010 3:57 pm
by martyboi Sat Apr 03, 2010 3:57 pm
with the corsa i had to pass the lines through the bulkhead, so i just used some large gromets to stop the pipe chaffing.
With the crossfire injector, it is important which line goes where into the injector.
the fuel line goes into the fitting that has two dimples, and the nitrous into the other, this is very important!
just remember not to over tighten the fittings, and to try to rout the pipe away from sources of heat.
martyboi- Admin
- Posts : 381
Points : 6315
Join date : 2010-03-27
Age : 40
Location : Norfolk -
System Testing
![]() by martyboi Sat Apr 03, 2010 4:11 pm
by martyboi Sat Apr 03, 2010 4:11 pm
Fuel
Turn off the nitrous valve and remove the injector, hold the injector in some old rag to collect the fuel.
With the engine running, arm the system and operate the micro-switch, and see if fuel is flowing out of the injector.
If there is no flow you have a problem! Do not operate the nitrous system without any fuel!!!
check the solenoid is wired up correctly, and the jet is not blocked etc..
If you have fuel, all is well.
Nitrous
Disconnect the earth from just the fuel solenoid (as you do not want the fuel to come out in this test!)
You do not need the engine running in this test.
Turn on the bottle valve, now hold the injector Wearing a thick glove!! and point the outlet away from the body,
Then... with the system armed, activate the micro-switch.
you should have nitrous come out of the injector, if not... check you have undone the valve, and that you actually have any nitrous in the bottle.
And that the the solenoid is wired up correctly.
If you have nitrous coming out of the injector.... all is well
Fuel system test
To check that the fuel system can cope with the extra work, you will NEED to do this test!
If you don't.. and the fuel system cannot cope supplying the extra fuel, your engine will run too lean.
This will probably result in major engine failure!
Disconnect the nitrous solenoid and turn off the valve, then undo the nylon fuel line at the injector end.
Replace the jet in the fuel solenoid for a size slightly larger than what will normally be used.
It is also a good idea to set up a fuel pressure gage, to monitor any pressure drop.
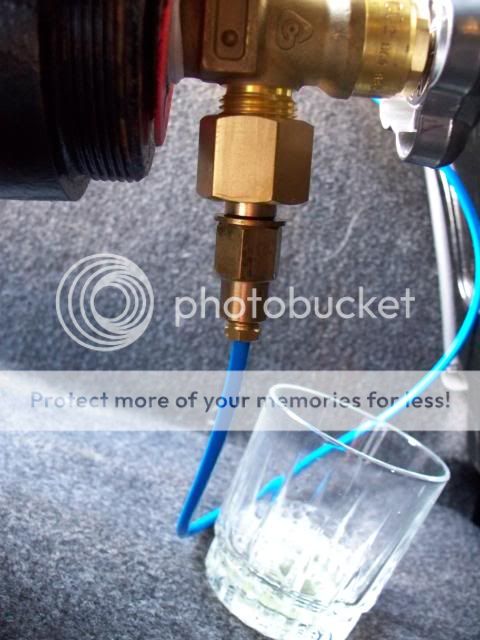
Now find a small plastic drinks bottle, and secure the line from the fuel solenoid into the bottle.
now with the engine running, activate the fuel solenoid for a period of about 10 seconds (this must be timed, not just a guess)
now remove the bottle and mark the amount of fuel collected on the side of it.

if you had a pressure gage fitted take note of any pressure drop when the system is activated (there should be very little)
Now empty the fuel out of the bottle, and secure it under the bonnet so it will not move about.

Now its time to repeat the test, but this time under full load conditions on the road.
eg, accelerate at full throttle from 3000rpm in third gear with the system activated for exactly the same time as the first test.
And also take note of any pressure drop, there should be NO more than 4psi !
Now remove the bottle and check how much fuel has been collected, there should be the same amount as before, or more.

If there is less, then the fuel system will not be able to supply the additional fuel. you WILL need to upgrade the fuel system to cope with the extra demand!!
Just remember that this test will need to be done again if you change the jets to a larger size than you have tested for.
Static test & road test
link here
Static test pro mod vid
Big power static test pro mod (don't try this at home
)Last edited by martyboi on Sun Apr 04, 2010 6:31 am; edited 1 time in total
martyboi- Admin
- Posts : 381
Points : 6315
Join date : 2010-03-27
Age : 40
Location : Norfolk -
Progressive controll
![]() by martyboi Sat Apr 03, 2010 4:18 pm
by martyboi Sat Apr 03, 2010 4:18 pm
This is OK if using a small shot, but if you want to add more power you will have to be able to progress the nitrous delivery.
Staged systems
In the early days people used to use staged systems, this would consist of two or more fixed hit systems, so basically a two stage system would have two sets of solenoids and injectors.
For example, the first stage would be jetted for a 25bhp shot, and would be activated first.
then the next stage would be a 50 bhp shot that would be activated next (but the first 25bhp system would deactivate)
Then the next stage would be both systems activated together resulting with a 75bhp shot.
so you would have 25....50.....75
This is a crude way of progressing nitrous delivery TBH, and it requires another set of solenoids, lines, injectors, wiring etc.
Pulsed systems
The most common way of progressing the delivery today is by pulsing the solenoids, this is done by using an electronic controller to pulse (open and close) the solenoids..... or should i say pulsoids

Here are the pulsoids in action on my corsa.
More info for the maximiser and fitting instructions. HERE
Smooth progressive system (REVO)
Won have now developed a smooth progressive system,
Its not available to the general public at the moment, but will be soon.
instead of pulsing the solenoids, they are opened like a tap, this has many benefits over pulsed systems.
more info HERE
revo vidHere's the first 'simple' video of a pair of REVO valves being operated by a Max Extreme.
To show the flow is linked to the Revo movement, we've added a position indicated to each drive shaft.
We also flowed nitrous through both Revo valves (rather than nitrous and fuel), for the following reasons;
1) It's safer
2) It's more obvious to see the changes in flow
You'll notice that the indicators and flow through each Revo is different and the reason for that is to demonstrate the mixture control that the Max Extreme provides.
Both Revo valves could be set to deliver equal flow but this demonstration shows how the mixture can be adjusted to optimum.
The following clip demonstrates the range of control that the Max Extreme offers over the Revo flow and shows how advantageous the combination will be over ALL existing nitrous control systems.
For this clip we set the Max to deliver 3 different flow rate ramps in 3 different gears. We added a break between each gear to define the change in gear but the Max can be set so the delivery continues to rise or drops to any level before rising again without any breaks, if required.
In these examples we set the 1st gear to start from zero and rise to 100% then switch off quickly, in the next gear it was set to rise to 100% immediately and then reduce flow slowly and in the 3rd gear it was set to rise from zero to 100 and back again evenly.
The possibilities (as the recycling advert says) are endless.
Click to watch revo gears
Now is there still anyone out there who doesn't grasp that this is the most advanced nitrous technology in the world????????
The next time anyone sees the likes of Speedtech, NX, NOS, Ny-Trex, etc. etc. claim that they have the most advanced nitrous products/technology in the world, just have a good laugh for me, because none of them would know advanced nitrous technology even if it smacked them in the face.
First production revo test
Last edited by martyboi on Sun Apr 04, 2010 6:36 am; edited 2 times in total
martyboi- Admin
- Posts : 381
Points : 6315
Join date : 2010-03-27
Age : 40
Location : Norfolk -
Nitrous do's & dont's
![]() by martyboi Sat Apr 03, 2010 4:21 pm
by martyboi Sat Apr 03, 2010 4:21 pm
Items without an * should be carried out before using the system. Items marked
with an * may apply to power increases above 25 bhp and items marked with a **
should apply to increases above 50 bhp. These are just general guidelines to
follow and can vary per application.
Do replace the existing distributor cap and rotor arm if applicable.
Do have your fuel system tested to make sure wanted power can be supported.
Do replace the existing spark plugs with one grade colder (harder).*
Do fit a set of quality plug wires (leads) if applicable.
Do fit a high capacity fuel pump.**
Do have your engine compression checked with a leakage tester (not a compression
gauge). 6% is just acceptable, but no cylinder should exceed a 10% leakage.
Do fit a high performance ignition coil and ignition system if applicable.**
Do retard your ignition timing 2 degrees for every 50 bhp.**
Do check torque settings of head bolts.
Do use only top quality oil. **
Do use high octane fuel (petrol) and even higher octane for power increases over 50%.**
Do purge the nitrous system at night or when the vehicle is left unattended.
Do fit an Ignition Delay Unit (IDU) or an ignition kill switch to prevent the possibility of
backfires that may be caused when starting an engine with a static nitrous charge in the
cylinders.
Do not operate the nitrous system without the engine running at a suitable rpm in an
appropriate gear.
Do not start the engine if you suspect the nitrous system has been activated while the engine
was not running. Purge the nitrous from the engine by removing the plug caps and cranking
the engine over, or fit an Ignition Delay Unit.
Do not use the nitrous system when the engine is off load other than for brief testing
during a static test.
Do not leave the nitrous bottle valve open while the engine is not running.
Do not use any components other than those supplied with the system. Each
component is an integral part of the system and incorrectly matched or unsuitable
components may cause engine failure at worst, or may not produce the best results at least.
NOTE: Remember that any weakness in the original design of the engine and transmission will be brought
nearer to it’s limit when large amounts of nitrous are used. Therefore it is advisable to strengthen any
such known weak components before too much power is added. It would be impossible to give details
for every vehicle as to exactly what mods will need to be carried out and at what % increase. However
we can say one thing for certain: the more power that you want, the greater the need to make
modifications. The areas that may need modifications are: fuel system, ignition components(as listed
above), head gasket, pistons, connecting rods, and clutch.
martyboi- Admin
- Posts : 381
Points : 6315
Join date : 2010-03-27
Age : 40
Location : Norfolk -
martyboi- Admin
- Posts : 381
Points : 6315
Join date : 2010-03-27
Age : 40
Location : Norfolk -
martyboi- Admin
- Posts : 381
Points : 6315
Join date : 2010-03-27
Age : 40
Location : Norfolk -
martyboi- Admin
- Posts : 381
Points : 6315
Join date : 2010-03-27
Age : 40
Location : Norfolk -
martyboi- Admin
- Posts : 381
Points : 6315
Join date : 2010-03-27
Age : 40
Location : Norfolk -
100bhp run
![]() by martyboi Sat Apr 03, 2010 4:45 pm
by martyboi Sat Apr 03, 2010 4:45 pm
martyboi- Admin
- Posts : 381
Points : 6315
Join date : 2010-03-27
Age : 40
Location : Norfolk -
WON Vids
![]() by martyboi Sun Apr 04, 2010 9:08 am
by martyboi Sun Apr 04, 2010 9:08 am
Our version of the event at Top Gear
5th Gear's Golf TDi 90 vs Honda NSX
And a funny static test vid using way too much nitrous!
Well i think that just about covers the basics of fitting a system, but just don't blame me if you bu**er it up OK.
And for the love of god..... don't buy anything unless it was made by wizards of nos!
Feel free to ask questions and ill help if i can, or at least try to point you in the right direction.
if you spot any mistakes... or just don't understand my ramblings give us a pm and let me know
martyboi- Admin
- Posts : 381
Points : 6315
Join date : 2010-03-27
Age : 40
Location : Norfolk -
Re: Guide to fitting a nitrous kit (pic heavy)
![]() by Scuderia Sun Apr 04, 2010 1:26 pm
by Scuderia Sun Apr 04, 2010 1:26 pm
Cheers Scuderia

Scuderia- Moderator

- Posts : 389
Points : 6618
Join date : 2010-03-30
Age : 53
Location : Bonny Scotland
Re: Guide to fitting a nitrous kit (pic heavy)
![]() by martyboi Sun Apr 04, 2010 2:08 pm
by martyboi Sun Apr 04, 2010 2:08 pm
martyboi- Admin
- Posts : 381
Points : 6315
Join date : 2010-03-27
Age : 40
Location : Norfolk -
Page 1 of 2 • 1, 2 ![]()
|
|
|